Saturday, June 29, 2024

Mystery Stamping!

Welcome to Mystery Stamping!  What is it you ask?  It is the perfect opportunity to use what you have in your stash as well a chance for us to create at the same time. Here is the kicker...only I know what the finished project should look like. 😀 

Here is how it works.  I share with you a list of supplies you need such as if you need card stock, DSP, how many colors of ink, what type of stamp(s) and the measurements for all of the paper. I also give you clues (steps) to completing the card. You get to pick colors and embellishments. 

So let's get started.  For mystery stamping you will need the following supplies:

Important information when picking out DSP; this card will be a vertical card so if using a directional pattern make sure it is cut going the correct direction (up/down).

1) Color card stock: 8 1/2" x 5 1/2" or 11" x 4 1/4"  
2) DSP: 3 1/2" x 1" (3 pieces, keep direction in mind)
3) DSP: 4" x 4" (coordinates with #2)
4) Color card stock: 3" x 2 1/4"
5) White card stock: 2 3/4" x 2"
6) White card stock: 5 1/4" x 4"
7) DSP: 1/2" x 5 1/2" 
8) Sentiment stamp set - sentiment should fit in a 2" x 2 3/4" space.
9) Embellishments you want to use. 

Once you have all the supplies pulled together you can watch the video below.  At the end of the video you will see the card I made along with you as well as 3 other samples.  Don't forget, if you need to you can always pause the video and catch up. 

Have fun! 


Wednesday, June 26, 2024

Magical Designer Series Paper

Designer Series Paper, Stampin' Up!'s double sided pattern paper, often just called DSP, is one of my favorite products to use.  Often it is a great accent to any card but there are times that DSP can do all the heavy lifting in making a card.  When it does it makes creating a card so very easy. 

Today I am going to show you how to let your DSP to all the heavy lifting in creating beautiful cards. What is great about this “technique” is that you need minimal supplies just stamps, ink and paper.  It is perfect for those who are new to card making.

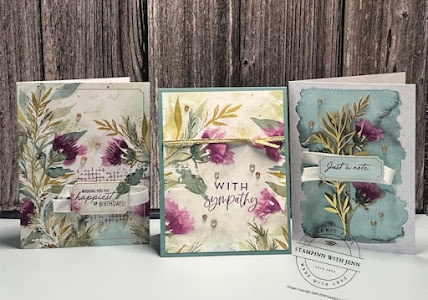
In today’s cards I used the Thoughtful Journey DSP from the Stampin’ Up!®  2024-2025 Annual Catalog.  I also used one of my most favorite stamp sets Courage & Faith.


Here are the dimensions and other details for the cards.  You can watch the video, see link below, from my YouTube channel to see how I made the cards. 


1st Card
Card stock:
Blackberry Bliss (5 ½” x 8 ½” scored at 4 ¼”) &  Basic White (5 ¼” x 4”)
DSP: Thoughtful Journey 5 ¼” x 4”
         Thoughtful Journey ½” x 5 ¼”                 
Ink: Petunia Pop
Stamp Set: Courage & Faith


2nd Card
Card stock: Misty Moonlight 5 ¼” x 8 ½” scored at 4 ¼”, Fresh Freesia 5 ¼” x 2 ¼” & 5 ¼” x 4” (Interior) & Basic White 5” x 3 ¾”
DSP: Thoughtful Journey 5 ¼” X 6” – Cut to make 4” and 2” 
Ink: Night of Navy
Stamp Set: Courage & Faith


3rd Card  
Card Sketch from Dawn Griffth 

Card stock: Lost Lagoon 11” x 4 ¼” scored at 5 ½”, Blackberry Bliss 3 ½” x 4 ¾” & Basic White 5 ¼” x 4”   
DSP:  Thoughtful Journey ½” x 5 ¼” & Thoughtful Journey 4 ½” x 3 3/8” -
 Cut 1 ½” off the bottom; cut the remainder into two pieces one is 1 ¼” and the other is 2” wide.            
Ink: Lost Lagoon
Stamp set: Courage & Faith


You can watch the video to see how I created these simple cards below or on my YouTube channel.


Saturday, June 22, 2024

Country Flowers


Country Flowers…another fun bundle by Stampin' Up®.  The more I use this bundle the more fun I have. Yesterday on my Fun Friday I made this card using this bundle as well as one of the sketches in the Annual Catalog as inspiration. In the video I shared two other cards I made using this bundle as a part of the Country Woods Mega Suite.  Check back in the near future for pictures and specific information for those cards. 

Here are the are all the measurements & details for the card I made in the video.

Card Measurements & Details:

Card Base: Thick white – 11” x 4 ¼” scored at 5 ½” OR 8 ½” x 5 ½” scored at 4 ¼”

Layer 1: Misty Moonlight 4 1/8” x 5 3/8”

Layer 2: Basic White 3” x 5”

Layer 3: Country Lace DSP 2 ¾” x 4 ¾”

Sentiment: Scrap of white 1” x 3” (This can change depending on what size your sentiment is.)

Ink: Pebbled Path & Memento Black

Stampin’ Blends: Gray Granite - light, Granny Apple Green- both dark & light

Watercolor Pencils: Garden Green & Old Olive

Stamp Set(s): Country Flower

Tools: Country Flower Dies & Stylish Shapes Dies


You can watch the video below to see how this card was made.


Supplies


Wednesday, June 19, 2024

Torn Paper Technique - Blending Brushes

Would you like to impress someone with a card that looks difficult but really isn't?  The torn paper technique using blending brushes is the way to accomplish that look. This is a technique that I taught in my May card making class that I host locally.  Let me walk you through this technique. All the measurements and supplies I used for this Thank You card are listed below. 


Card Measurements

Card base: 5 1/2" x 8 1/2" scored at 4 1/4" along the long side.

Layer: 4" x 5 1/4" 

Scrap card stock: 6"x6" (used to create the torn look with the ink)

Instructions

Using light tack tape, I use Post It Cover Up tape, secure your 4" x 5 1/4" card stock to the surface you are working on. 


Next tear the piece scrap card stock in half creating an uneven edge.  


Using the low tack tape cover the left & right or the top & bottom edges of the card stock you have secured to the work surface.  


Now you will use the blending brush(es) to apply the ink to the layer.  To apply you gently swirl you the brush over the layer starting at the top and working your way to about half way down the layer.  If you are using more than two colors you will adjust how far you go down so that there is enough room for all the colors.  Using a blending brush add the additional colors.


When you are done remove the scrap card stock and you will see the appearance of torn paper edges.  Now you can stamp it with any image or sentiment you would like.  I find that black line images look the most striking on this type of background. 


Saturday, June 15, 2024

Expressions of Kindness - Card Kit

Today I will be sharing with you the newest Stampin' Up! card kit, Expressions of Kindness. It is by far one of my MOST FAVORITE kit from Stampin' Up!  

This kit allows you to make 8 cards (4 of each design) and contains all the supplies needed along with instructions.  If you want to get creative you can go "rogue" as me and some of my stamping friends call it.  All this means is that you don't follow the instructions and you let your own creativity take over.  When you do this and add a some additional cardstock you can often double or triple the number of cards you can make with this kit.   Below is a video from my Fun Friday lives I hold each week on my Facebook business page.  Watch the video and you can see me make 3 cards; 2 are following the instructions and 1 is going rogue! 😊


Click here to watch the video showing me make the above cards. 


Supplies used for these cards


Friday, June 14, 2024

Welcome to my blog!

Hello and welcome to my blog, Stampinn with Jenn.  My name is Jennie and I am a Independent Stampin' Up! demonstrator.  I have been stamping on and off for about 16 years.  More off than on because my children kept me very busy while they were younger. About 3 years ago I rediscovered my love and enjoyment of expressing creativity through stamping and paper crafting.  

I am so excited to be starting this new adventure of blogging.  What will you find on my blog?  Well I hope to share tips/tricks in stamping, stamping techniques, my spin on cards and paper projects and most importantly to inspire you in your creativity.  

For now the plan is to post every Saturday and Wednesday, unless something very exciting is happening in the Stampin' Up! world.  If there is something exciting happening you can be sure I will be sharing it with you here at Stampinn with Jenn! 

You will also be able to find links to my other social media; Facebook business page, Instagram, YouTube Channel and my Stampin' Up! website. 

So I invite you to join me on this journey of creativity in stamping and paper crafts!  

Coordinating Card with Four Corner Stamping Technique

Teach it Tuesday this week focused on the fun technique called Four Corners.  This technique is simpler than it looks and sounds.  I learned...