Wednesday, October 30, 2024

Decorative Trees & In Color Christmas Trees

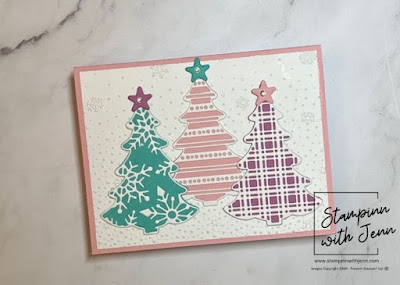
Using card Decorative Trees Bundle from the September - December 2024 Mini Catalog,  Tammy and I created fun Winter/Christmas cards during our Teach it Tuesday yesterday.  Tammy focused on using traditional colors whereas I went out of my comfort zone and used very non-traditional colors; Petunia Pop, Summer Splash and Pretty In Pink.  Not excatly colors that come to mind when I think Christmas.  However, I have to say I was very surprised how pretty they looked together.  

Check out all the details and measurements for creating this card below and watch the video to get some tips and tricks when using intricate dies to cut card stock. 


Details:

  • Card base: Pretty in Pink 8 1/2" x 5 1/2" scored at 4 1/4"
  • Layer #1: Basic White 5 1/4" x 4" embossed with Snowflake Sky 3D embossing folder
  • Layer #2: 3 pieces of 3" x 4" (one of each color)
  • Layer #3: 3 pieces of 3" x 4" Basic  White backed a piece of adhesive sheet (one for each decorative die design)
  • Interior: 5 1/4" x 4" Basic White 
  • Other items used:  Stampin' Dimensionals (mini), Foam Adhesive Sheets, & Rhinestone Jewels


Watch the replays for both my card and Tammy's card here:
Products used:


Tuesday, October 29, 2024

Decorative Trees - Teach It Tuesday


Join Tammy and I today for Teach it Tuesday we will be creating Christmas cards using the Decorative Trees Bundle from the September - December 2024 Mini Catalog.  I will be using non-traditional Christmas colors and Tammy will be using the more traditional colors.  

You can watch Tammy live on her Facebook page Cards by TLC this morning at 11 am PT/ 12 pm MT/ 1 pm CT/ 2 pm ET.

My live will be on my Facebook page Stampinn with Jenn in the afternoon at 4 pm PT/ 5 pm MT/ 6 pm CT/ 7 pm ET.

I hope you can join us, if not you can find links to replays here on my blog tomorrow.  

Saturday, October 26, 2024

Mystery Stamping with Iconic Imagery & Iconic Celebrations

Have I got a great sketch for you! I used it for my Mystery Stamping yesterday during Fun Friday.  I was perusing Pinterest and stumbled on a blog called Poetic Artistry and they have Mojo Mondays.   In case you want to follow along and be surprised on the final result I will post the video and supply list first, then below the video I will share the cards I made using this sketch.  The first one is from the video but the other three are the same card sketch but different colors and paper.  😀  


If you want to create the card following the video here are the supplies you will need.

Details:

  • Card base:  Card stock 8 1/2" x 5 1/2"
  • Layer #1: Card stock or DSP 1 1/4" x 4 1/4"
  • Layer #2: Card stock 3/4" x 4" 
  • Layer #3: 2" square 
  • Layer #4: 2 1/2" circle 
  • Stamp sentiment, Coordinating ink, Embellishments, and Adhesives of choice/Deminsionals


Here are some pictures of the cards I made using this layout and then you will see the sketch itself.  Links to all the products will be listed below. The cards below feature the pattern paper Reindeer Days and Countryside Inn. The sentiments are from So Sincere, Iconic Imagery and Kindest Expressions. 


Here is the card I made in the video.


Supplies used in the video: 


Wednesday, October 23, 2024

Stampin' Up! Iconic Celebration Thank You Card

 
With Thanksgiving right around the corner (5 weeks from tomorrow) you might find yourself needing a card to say thank you to that friend or family member who hosted a gathering or brought something to help you out at the gathering you hosted.  Either way both I and Tammy have got that covered with the cards we made for our Teach it Tuesday.  We used the Iconic Celebration pattern paper.

My card shows off the cute acorn pattern along with featuring the colors Mossy Meadow, Cajun Craze and Basic Beige.  The design is based on a sketch I saw from Poetic Artistry on Pinterest.  Below are the measurements and other details for the cards. There are two cards very similar, the difference is in the embellishment.  It's what happens when you accidently glue down the cardstock before attaching the ribbon. LOL But thankfully my friends on the live with me helped me pivot. Sorry if you are reading that in a Ross Geller voice, I know I am. LOL They suggested I try Stampin' Up!'s linen thread.  Worked beautifully and I think I like it even better.  So it is a happy mistake. 

Which one do you like best the card with the linen thread or the one with the Basic Beige ribbon? Let me know in the comments. 


Details are the same for both card except the thread/ribbon:

  • Card base: Basic Beige 8 1/2" x 5 1/2" scored at 4 1/4"
  • Layer #1: Mossy Meadow 5 1/4" x 4" embossed with the Timber 3D embossing folder
  • Layer #2: Acorn pattern paper 2" x 4 1/2" 
  • Layer #3: Acorn pattern paper 1 3/4" x 3 1/2" 
  • Layer #4: Ribbon 6"*  & 1 1/2" x 1 1/2" Basic Beige for leaf stamp
  • Layer #5: 2"x 2" Basic Beige using Stylish Shapes 
  • Interior: 5 1/4" x 4" Cajun Craze Leaf pattern paper & 3 1/2" x 4 3/4" Basic Beige
  • * If you chose to use the linen thread I believe I used about 16 - 18 " 


Watch the replays for both my card and Tammy's card here:

Products used:


Saturday, October 19, 2024

Stampin' Up! Sweet Days of Autumn & Autumn Days to Remember

Fall is in the air, craft fairs are on the calendar so I was inspired to make a few more Autumn cards.  So I perused my Pinterest boards and found one of my favorite resources for card sketches, Dawn's Stamping Thought.  So I am using one of her sketches as well as a basic design of my own. 

The first card was based on the sketch from Pinterest.  Here is a picture of the sketch as well as a picture of the cards I made.  Below you can find all the details. 


Details: 
  • Card base: 11" X 4 1/4" (scored at 5 1/2")
  • Layer #1: 3 pieces of card stock 1 1/2" x 2 3/4"  (I embossed with the Timber 3D embossing folder
  • Layer #2: 3 1 3/4" circles (I used the Stylish Shapes dies) 
  • Layer #3: 3" x 2 1/2" (for Heartfelt Hexagon punch) 
  • Embellishments: 2023-2025 In Color Opaque Dots

The second card is perfect for those who are new to stamping and card making.  It uses just paper (both card stock and patterned paper), ink and stamps!  


Details:
  • Card base: 11" x 4 1/4" or 8 1/2" x 5 1/2"
  • Layer #1: Pattern paper  4" x 3" or 5 1/4" x 2"
  • Layer #2: Very Vanilla 4" x 2 1/4" or 5 1/4" 2" 
  • Layer #3: Strip of paper 1/2" x 5 1/2" (for either card you can trim off the excess)
  • Extra card stock: 2" x 3" (used to bridge the card stock and pattern paper)

To see how I created these cards you can watch my video here or on my YouTube Channel.


Supplies used:


Wednesday, October 16, 2024

Snowy Wonder & Snowy Scenes Card Sketch

Using card sketch #1 from the Stampin' Up! Annual Catalog, found on page 22, Tammy and I created fun Winter/Christmas cards during our Teach it Tuesday yesterday.  I used the Snowy Wonder bundle and the Snowy Scenes pattern paper. I utilized the short cut of using the dies to cut out the cute penguin and tree from the designer series paper.  You can check out more information about that shortcut on my video below.  Also, the details and measurements for creating this card are listed below too.  Here is the sketch that was my inspiration. 


My card does not follow this sketch to the "T" but has been tweaked just a little so that it would work with the sentiment I wanted to use.


Details:

  • Card base: 11" x 4 1/4" scored at 5 1/2" 
  • Layer #1: 4 1/8" x 5 3/8" (I used an embossing folder for this layer)
  • Layer #2: 2 3/4" x 3"
  • Layer #3: 2 1/2" x 3 3/4" (Two tone paper embossed and sanded down)
  • Layer #4: 2 3/4 x 1 1/4"  (white for sentiment)
  • Interior: 5 1/4" x 4" (white)

The embossing folder I used was the Snowflake Sky 3D and the Two Tone paper was Pool Party. I used white bakers twine and the dark Pool Party Stampin' Blend to make the bow coordinate with the card. 

To see how I put it together and hear some card making tips you can watch the video.


Watch the replays for both my card and Tammy's card here:

Products used:


Tuesday, October 15, 2024

Snowy Wonders Card Sketch

During today's Teach it Tuesday with Tammy & Jennie we will be sharing cards made using a sketch from the Annual Catalog.  


You can catch Tammy's live on her Facebook Business page Cards by TLC.  She will start her live at 11am PT/ 12pm MT/ 1pm CT/ 2pm ET.


I will be going live on my Facebook Business page Stampinn with Jenn.  I will start at 4pm PT/ 5pm MT/ 6pm CT/ 7pm ET.  

We hope you can join us.  If not you can catch the replays since we will both be posting our videos on our blogs.  So check back tomorrow and all the links will be available.  

Wednesday, October 9, 2024

Garden Meadow Bundle & 24-26 In Colors

As promised here is another card using the Garden Meadow bundle when I was a Guest Stamper for my Stampin' Up! group in September.  I had fun coloring in the wheelbarrow with Stampin' Blends in different In Colors; Boho Blue, Petunia Pop, Shy Shamrock and Pretty in Pink.  I'll say it now and you will probably hear me say it again...I wish Boho Blue wasn't going away in 2025, it goes with so many colors. It is a part of the 23-25 In Color family which means it retires at the end of April 2025.  For all the details and measurements check out below. 


Details:

  • Card base: 8 1/2" x 5 1/2" Petunia Pop scored at 4 1/4" 
  • Layer #1: 4 1/8" x 5 3/8" embossed with the Exposed Brick embossing folder
  • Layer #2: Deckled Rectangle in Basic White (approximately 4" x 3") 
  • Layer #3: Wheelbarrow stamped in Memento Tuxedo Black and colored in using Stampin' Blends (Boho Blue, Crumb Cake, Petunia Pop, Shy Shamrock, Pretty in  Pink & Gray Granite) 
  • Embellishments: Petunia Pop In Color Resin Dots

I did use Foam Adhesive Sheets to pop the wheelbarrow off the card. 

Happy Stamping!

Supplies used:

Sunday, October 6, 2024

Annual Stampin' Up! Stamp Sale


If you have any stamps sets you having been wanting to add to your stamping stash?  Do you have any stamp sets on your wish list?  Well starting tomorrow, Monday October 7th you can save 15% off of all stamp sets in the Annual Catalog.  Bundles are not included.  The sale lasts for 3 short days and stamps are available while supplies last.  

Take advantage of this sale and head on over to my online shop


Saturday, October 5, 2024

Two Masking Techniques - Courage and Faith & Spotlight on Nature

The masking technique can often seem very intimidating however it doesn't have to be.  Yesterday during my Fun Friday Live I demonstrated two very simple masking techniques, reverse masking & frame masking.  


The first technique in my video is the reverse masking technique.  The left card using Daffodil Delight, Soft Sea Foam and Lemon Lolly was created using the reverse masking technique.  The second card, on the right, was made using what I call the frame masking technique.  This technique reminds me a lot of the torn paper technique I do on occasion. 

Here are the details for each card.

Reverse Masking  
  • Card base: 8 1/2" x 5 1/2" scored in the middle at 4 1/4"
  • Layer #1: 5 1/4" x 4" 
  • Interior panel: 5 1/4" x 4" (usually white or very vanilla)
  • Reverse masking used the middle circle in the Deckled Circles die set (either 7 or 8 from the center).  The die was used to cut the circle from the masking paper. 
  • Shading was created by using small blending brushes.


Frame Masking
  • Card base: 8 1/2" x 5 1/2" scored at 4 1/4" 
  • Layer #1: 5 1/4" x 4" 
  • Interior panel: 5 1/4" x 4" (usually white or very vanilla)
  • Frame is created by placing strips of the masking paper around each side of the first layer. 
  • Shading was created by using small blending brushes.


Tip for using masking paper: before you place the masking paper on your card stock tap the sticky surface on a piece of material (pants, shirt, etc.) 2 or 3 times.  This will allow the paper to retain some stickiness but it won't be so sticky that it rips your cardstock when you peal the mask off. 

These two masking techniques have become new favorites especially right now while I prepare for craft fair season. 

Happy Stamping! 


Supplies used:

Friday, October 4, 2024

Fun Friday - Masking Technique


Have you heard about the masking technique?  Are you curious how it works? Well join me today on my Fun Friday Facebook live and I will share with you two ways to do this technique. I will be on at 4 pm PT/ 5pm MT/ 6pm CT/ 7pm ET.  I would love to see you there.  If you can't make it then you can watch the recorded video here tomorrow morning. 

Thursday, October 3, 2024

Stampin' Up! Kits Collections On Sale Now!

Exciting News! For the whole month of October the entire Kits Collection, both card and craft, will be on sale for up to 30% off. That is over 40 different kits you can choose from.

Kits are excellent for many different reasons, here are a few:
  • Quick and easy ways to craft and good for just about any age.
  • They are an all inclusive with step by step instructions, perfect for both new and experienced crafters.
  • They are packaged in a compact sturdy box that is perfect for storage and travel.
  • They make excellent gifts for your family and friends who love to craft. 

Check out the list below! I know I have a few on my list! If any look interesting you can shop here at my online store.


Wednesday, October 2, 2024

Reindeer Days Gift Card Holder

Tis' the season for gift card holders!  Today during Teach it Tuesday with Tammy & Jennie we shared a couple of different gift card holders you can easily make. These gift card holders create a little excitement when gift giving.  

My gift card holder was inspired by Julie the Paper Pixie.  She made an accordion fun fold card and then I put a twist on it by making it into a gift card holder. 

Here is my spin on her card.  The details and measurements are listed below.


Details:

  • Card base: 11" x 4 1/4" scored along the 11" side at 2 3/4" & 7 1/4"  then flip it over and score at 4 1/4" & 8 1/2" 
  • Layer Card front: Patterned paper 4"x4" 
  • Layer Card middle: Patterned paper 4"x4"
  • Sentiment on card front: 3 1/4" x 2" & 1 3/4" x 3 (white)
  • Gift card pocket: 2" x 4" 
  • Interior: 4" x 2 1/4" (white)


To watch how this card is made you can follow along with this video.


Watch the replays for this card or for Tammy's card here:


Supplies used: 


Tuesday, October 1, 2024

Gift Card Season


Today's Teach it Tuesday with Tammy and Jennie will be featuring gift card holders.  We all know that they have become a big part of the holiday season whether it is that hard to shop for family member, your child's teacher(s), or that co-worker in a gift exchange.  Tammy and I will have two very different gift card holders to share with you today.  


You can catch Tammy's live on her Facebook Business page Cards by TLC.  She will start her live at 11am PT/ 12pm MT/ 1pm CT/ 2pm ET.

I will be going live on my Facebook Business page Stampinn with Jenn.  I will start at 4pm PT/ 5pm MT/ 6pm CT/ 7pm ET.  

We hope you can join us.  If not, never fear, we will both be posting our videos on our blogs.  So check back tomorrow and all the links will be available.  

Coordinating Card with Four Corner Stamping Technique

Teach it Tuesday this week focused on the fun technique called Four Corners.  This technique is simpler than it looks and sounds.  I learned...