Wednesday, March 26, 2025

Spring Floral & Gingham Sketch Challenge

Not sure about you but I am soooo ready for the weather to reflect the season we are in.  I love, love, love spring.  That is why I was so excited to play with the Floral and Gingham Vellum paper from Stampin' Up!

This week's Teach it Tuesday Tammy and I decided to do a sketch challenge.   I was not able to go live this week because I am spending time with family out of town so below you will find my card, the sketch and some details on how to make the cards.  

Sketch:


Measurements:

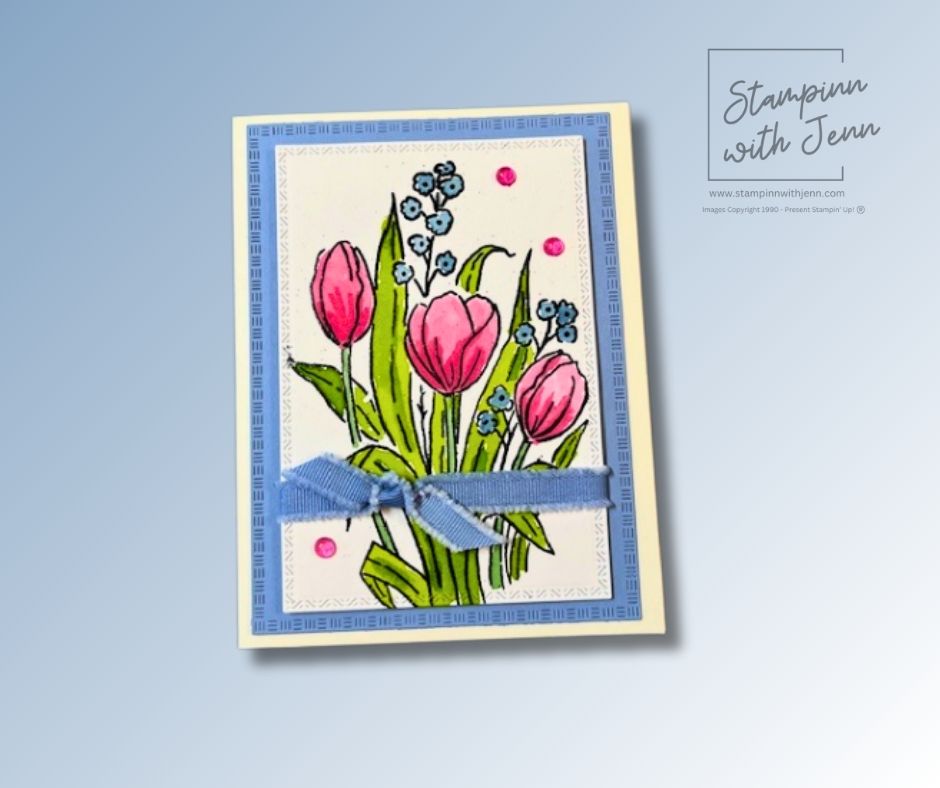
Card Base: Lemon Lolly 11" x 4 1/4" scored at 5 1/2"
Layer #1: White 3 1/2" x 4 3/4" & Balmy Blue Floral Vellum 3 1/2" x 4 3/4" 
Layer #2: Old Olive 2" x 4" 
Layer #3: White card stock 3" square
Interior: White card stock 4" x 5 1/4" and matching vellum 1/2" x 6"

Instructions:

1. Fold Lemon Lolly base at 5 1/2".
2. Create banner with white card stock.  Mark 1 3/4" along the short side.  Next measure up 1" and draw a line.  Now draw a line from the center line to the corner of each side of the card stock.  See photo. 

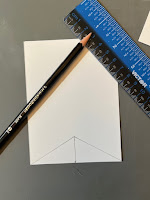
3. Cut the triangle out to create the banner. 

4. Adhere the vellum to the white card stock.  Place the adhesive in the center of the card stock. 


6. Trim the vellum to create the banner.  Adhere it to the center of the front of the card base.

7. Emboss the Old Olive with the Cane Weave embossing folder.  Adhere it vertically in the center of the banner.  

8. Die cut out of of the 3" square white card stock with the 2 3/4" dots/dash circle from Spotlight on Nature.

9. Stamp the sentiment using Balmy Blue in the center of the circle.  

10. Make a bow with the Linen Thread and attach at the bottom right of the circle.

11. Attach the circle to the Old Olive layer using a piece of foam adhesive. 

12. Finish it off with a couple of bee trinkets by adhering them with mini glue dots. 

13. Finish off the inside by adhering the 1/2" strip of vellum to the bottom of the 4" x 5 1/4" panel.  Trim off any overhang. 


I hope you had as much fun creating this card as I had.  The sketch that I used can be used with so many different papers, dies, stamp sets and other product.  You can tweak it by changing up the shapes a little bit; maybe use a square rather than a circle or place a circle as the second layer on the banner with the sentiment being stamped on a square.  So many different directions to go with this sketch as a springboard for ideas.  


To see Tammy's take on this sketch you can head on over to her blog Cards by TLC.

For supplies:


Wednesday, March 19, 2025

Spring Water Color Card with Mixed Florals

Spring has sprung! I have been looking forward to working with my Mixed Florals stamp set and now is the perfect time. 

This suite is one of my favorites because of two things. First the flowers! OH MY GOSH! I just love the tulips and cone flower (I think that is what it's name is) on the paper and the stamp set.  Second, it has Boho Blue in it. Man I am going to miss that color when it retires at the end of April.  

Today I am focusing on the tulip stamp and using Boho Blue.  To make this card I pulled out my black embossing powder and my water painters to do some water coloring.  


Details:
Card Base: Very Vanilla 8 1/2" x 5 1/2" scored at 4 1/4"
Layer #1: Boho Blue 4 1/4" x 5 1/2" die cut with the largest rectangle in the Textured Notes Dies
Layer #2: Water Color paper with stamped image.  Die cut out with the second largest die from the Textured Notes dies after you have colored in the stamped image.
Layer #3: 7" piece of the ribbon.  Colored with Stampin' Blend marker. Cut into two pieces after colored.  4" and 3" 
Interior:  4 1/4" x 5 1/2" Boho Blue & 4" x 5" Very Vanilla 

To watch how all this magically comes together check out the video below.  


After you check out my video please head over to my Teach it Tuesday partner Tammy Civello's blog Cards by TLC to see her beautiful spring card!  It is so pretty and simple! 

Product Used:


Wednesday, March 12, 2025

Meant too Bee Cards!

Did you know that scrapbooking kits aren't just for scrapbooking!?  They can be used for card making too!  During this week's Teach it Tuesday we focused on creating cards with pieces and parts of the Meant Too Bee Scrapbooking Kits from Stampin' Up!  I have so much fun using the scrapbooking kits to not only recording memories but to make cards too!

During my video I made two cards using the scrapbooking kit and coordinating Meant Too Bee bundle.  Below you will find the measurements for the cards, video showing how I made the cards and links to Tammy's blog and video. 


Card measurements:

First Card:

  • Card base: 11" x 4 1/4" scored at 5 1/2"
  • Layer #1: Two Tone card stock 5 1/4" x 4" 
  • Layer #2: Two hexagon dies (smallest hexagon die) cut from pattern paper
  • Layer #3: Three heart punch outs from the kit
  • Interior: White card stock 4" x 5 1/4" & 4" piece of coordinating sticker border from kit

Second Card:

  • Card base: 8 1/2" x 5 1/2" scored at 4 1/4" 
  • Layer #1: 3 1/2" x 3 1/2" pattern paper
  • Layer #2: 4 3/4" x 1 3/4" pattern paper
  • Layer #3: 1 1/2" x 3 1/2" pattern paper
  • Layer #4: 2 3/4" x 1" coordinating card stock
  • Layer #5: Sticker sentiment 
  • Layer #6: Sticker from kit
  • Interior: White card stock 4" x 5 1/4" and 5 1/4" piece of coordinating sticker border from kit


To see Tammy's amazing fun fold card using this scrapbooking kit you can go to her blog, Cards by TLC.


Products used: 


Sketch Challenge - Thank You Card

One of my favorite items found in this past year's Stampin' Up Annual Catalog is the card sketches they shared with us on page 22.  ...